Description:
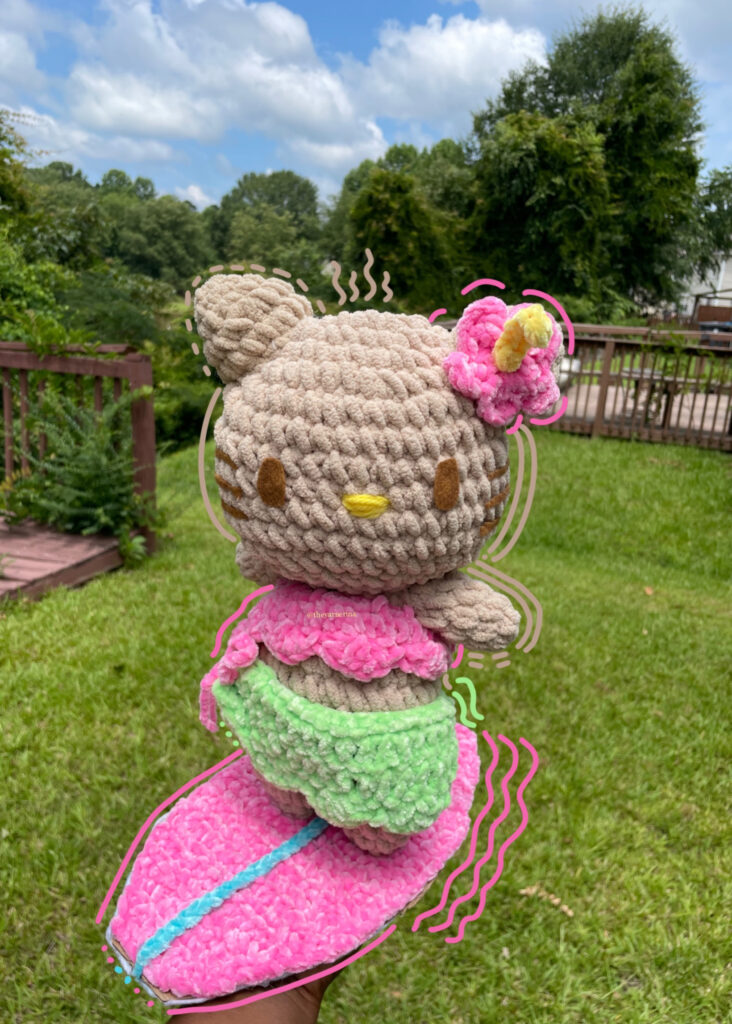
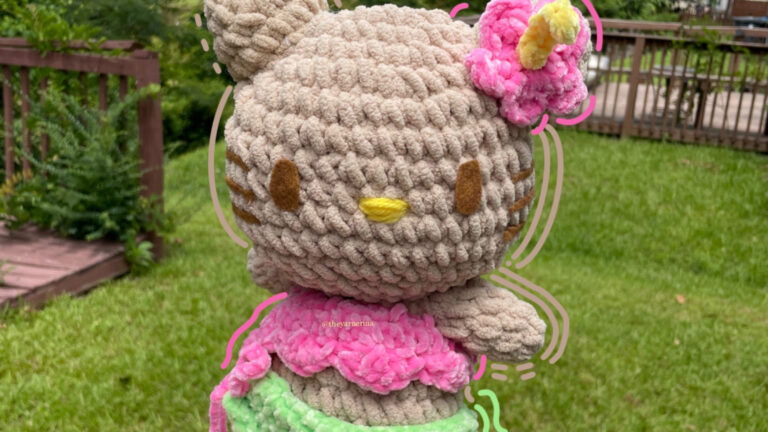
Dive into a tropical crochet adventure with the Hawaiian Hello Kitty Crochet Plush! This delightful project is perfect for intermediate crocheters who enjoy detailed work and assembling adorable characters. The pattern features Hello Kitty in a charming Hawaiian outfit complete with a flower, scalloped-edged top and skirt, and a fun surfboard accessory. Crafted with chunky yarn and a 5mm hook, this plush is not only quick to make but also incredibly cute and cuddly. Whether you’re making it as a gift or for your own collection, this Hawaiian Hello Kitty will bring a splash of island fun to any space. Happy crocheting!

Some things to keep in mind before starting this pattern:
Difficulty Level: Intermediate
Reasons for Intermediate Level:
- Variety of Techniques: The pattern involves several techniques including working in rounds, increasing, decreasing, and joining pieces.
- Shaping: The body construction and the assembly require understanding of how to shape and form 3D objects from flat pieces.
- Assembly: The project involves assembling multiple parts (head, body, arms, ears, flower, and surfboard) which requires precise placement and sewing.
- Detail Work: Adding features like the scalloped edges for the top and skirt, and embroidering the nose involves some attention to detail and precision.
Tips for Success:
- Stitch Markers: Use stitch markers to keep track of your rounds and stitches.
- Consistent Tension: Maintain a consistent tension throughout your work to ensure the pieces fit together well.
- Stuffing: Be sure to stuff the body and head firmly but evenly to maintain the shape of the plush.
- Patience with Assembly: Take your time when sewing parts together to ensure proper alignment and a neat finish.
If you are comfortable with these techniques and enjoy detailed projects, this Hawaiian Hello Kitty plush will be a rewarding and adorable creation! Happy crocheting!
Hawaiian Hello Kitty Crochet Pattern
Materials Needed:
- Yarn: Chunky yarn in the following colors:
- Beige (for the head and body)
- Pink (for the flower, top, and surfboard)
- Yellow (for the nose)
- Green (for the skirt)
- Light blue (for the surfboard detail)
- Hook: 5mm crochet hook
- Stuffing: Polyester fiberfill
- Felt: For the eyes and Wiskers Details
- Glue: I used hot glue to attatch the eyes and wiskers, but you can use whatever kind of glue you’d like
- Embroidery needle: For sewing parts together and embroidering details
Abbreviations:
- ch: Chain
- sc: Single crochet
- inc: Increase (2 sc in one stitch)
- dec: Decrease (sc two stitches together)
- st: Stitch
- sl st: Slip stitch
- HDC: Half double crochet
- DC: Double crochet
- FO: Fasten off
Legs and Body:
Legs (make 2 and join):
First Leg:
- Round 1: Magic ring, 5 sc in the ring (5)
- Round 2: Sc, inc around (7)
- Round 3: 2 sc, inc around (10)
- Round 4-5: Sc around (10) [2 rounds]
- FO, leaving a long tail to join the legs later.
Second Leg:
- Round 1: Magic ring, 5 sc in the ring (5)
- Round 2: Sc, inc around (7)
- Round 3: 2 sc, inc around (10)
- Round 4-5: Sc around (10) [2 rounds]
- Do not fasten off. Continue to join the legs.
Joining the Legs:
- Chain 2, join with a slip stitch to the first leg.
- Round 1: Sc around the first leg (10), sc in each of the 2 chains (2), sc around the second leg (10), sc in each of the 2 chains on the opposite side (2) (24)
- Round 2: 3 sc, inc around (30)
Body:
- Round 3-7: Sc around (30) [5 rounds]
- Round 8: 3 sc, dec around (24)
- Round 9: sc around (24)
- Round 10: 2 sc, dec around (18)
- FO, leaving a tail for sewing. Stuff firmly.
Head:
- Round 1: Magic ring, 6 sc in the ring (6)
- Round 2: Inc in each st around (12)
- Round 3: Sc, inc around (18)
- Round 4: 2 sc, inc around (24)
- Round 5: 3 sc, inc around (30)
- Round 6: 4 sc, inc around (36)
- Round 7-12: Sc around (36) [6 Rounds]
- Round 13: 4 sc, dec around (30)
- Round 14: 3 sc, dec around (24)
- Round 15: 2 sc, dec around (18)
- FO, leaving a tail for sewing. Stuff firmly.
Ears (make 2):
- Round 1: Magic ring, 4 sc in the ring (4)
- Round 2: Sc, inc around (6)
- Round 3: Sc, inc around (9)
- Round 4-5: Sc around (9)
- FO, leaving a tail for sewing. Stuff nicely and sew onto the head.
Arms (make 2):
- Round 1: Magic ring, 6 sc in the ring (6)
- Round 2-6: Sc around (6)
- FO, leaving a tail for sewing. Lightly stuff and sew onto the body.
Flower:
- Round 1: Magic ring, 6 sc in the ring (6)
- Round 2: Sc, ch 2, sc in each st around (12)
- Yellow Flower center is a chain of 6 then 5 sc before FO
- FO, leaving a tail for sewing. Attach a yellow center piece and sew onto the head.
Skirt:
- Row 1: Ch 30 (or as many as needed to fit around the body), join with a sl st to form a ring.
- Row 2: Ch 1, sc in each ch around, join with a sl st.
- Row 3: Sc, inc around
- Row 4: Sc in each st around.
Scalloped Edge:
- Row 5: Sk 1 st, 5 DC in next st, sk 1 st, sl st in next st around.
- FO, weave in ends. Attach the skirt to the body.
Top:
- Row 1: Ch 20 (or as many as needed to fit around the body just under the arms), join with a sl st to form a ring.
- Row 2: Ch 1, sc in each ch around, join with a sl st.
- Row 3: Sc in each st around.
Scalloped Edge:
- Row 4: Sk 1 st, 5 DC in next st, sk 1 st, sl st in next st around.
- FO, weave in ends. Attach the top to the body.
Surfboard:
- Row 1: Ch 25
- Row 2: Starting from the 2nd ch from hook, sc in each ch across (24)
- Row 3-15: Ch 1, turn, sc in each st across
- Round the edges: Sc around the entire piece, placing 3 sc in each corner to keep it flat.
- FO, weave in ends.
- With light blue yarn, stitch a stripe down the middle of the surfboard.
Assembly:
- Assemble the Kitty:
- Sew the head to the body.
- Sew the arms to the sides of the body.
- Sew the ears to the head.
- Sew the flower to the head.
- Add Details:
- Attach safety eyes to the head.
- Embroider the nose with yellow yarn.
- Attach the skirt and top to the body.
- Finishing Touches:
- Weave in any loose ends.
- Ensure all parts are securely attached.
- Place the kitty on the surfboard, or sew the surfboard to the feet for stability.
Your Hawaiian Hello Kitty crochet plush is now complete! Enjoy your adorable creation!
I hope you enjoyed this pattern and found it easy to follow.
I’m so glad our crafty paths have crossed, happy crocheting!
CHECK OUT MORE PATTERNS AND CRAFT IDEAS BELOW
